Enabling Active Directory Federation Services for VMware Cloud Foundation
Disclaimer
This content is provided for historical reference and may no longer reflect current guidance or best practices.

Ever wanted to have a true single sign-on experience with your on-premises VMware Cloud Foundation-based private cloud?
In the Summer of 2020 I spent quite a bit of my spare time digging in and learning adjacent product and cloud technologies. One of the products that landed in my view was Active Directory Federation Services with VMware products.
This blog post provides implementation guidance for integrating the following with Active Directory Federation Services (AD FS) for Single Sign-On based on VMware Cloud Foundation 4.x and VMware Validated Design 6.x.
-
VMware Cloud Foundation 4.1 and later.
-
VMware Center Server 7.0 Update 1 and later via native Active Directory Federation Services integration.
-
VMware NSX-T 3.0 and later via Workspace ONE Access and Active Directory Federation Services as a third-party identity provider integration.
-
VMware vRealize Suite 2019 (8.x) and later via Workspace ONE Access and Active Directory Federation Services as a third-party identity provider integration.
Information
-
This is only for greenfield deployment.
-
Conversion from Active Directory with Integrated Windows Authentication or Active Directory over LDAP to Active Directory Federations Services does have some impactful change to users/groups along with their roles and permission for some products (e.g., vRealize Automation).
-
vRealize Suite-to-NSX integrations (e.g., vRealize Automation and vRealize Operations to NSX cloud accounts/integrations) must use the
adminaccounts instead of service accounts as API based logins CAN NOT be passed back to Active Directory Federations Services. This is a known issue with third-party Identity Providers via Workspace ONE Access. -
There are no issues observed with vCenter Server authentication or application-to-vSphere service account connectivity.
-
There are no issues observed with vRealize Suite and NSX-T authentication via ADFS.
-
There are no issues observed with vRealize to vRealize integrations.
-
SDDC Manager does not directly integrate with Active Directory Federations Services. A fresh login will use the SDDC Manager login UI; however, if already logged into vCenter Server only the user name must be provided.
-
Please, fully test this yourself before deploying into production.
Microsoft Active Directory Federation Services on Microsoft Windows Server 2019 (AD FS 4.0)
Deployment of Microsoft Active Directory Federations Services on Microsoft Windows Server 2019
Prerequisites
-
A Microsoft Active Directory Domain Services for Windows Server 2019 for directory services.
-
A Microsoft Active Directory Certificate Services implementation or another available certificate authority for certificate services.
-
A certificate authority-signed certificate for Microsoft Active Directory Federation Services in the
.pfxformat. This is provided by CertGenVVD in thename.4.p7bcertificatename.4.pfx. -
A Microsoft Windows Server 2019 virtual machine with a static IP address, along with forward-reverse DNS entries for the desired FQDN(s) (e.g.,
adfs.rainpole.io == 172.16.1.100).
A Simple Example Implementation
Example
This is a simple example of the deployment of Microsoft Active Directory Services (v4.0) on Microsoft Windows Server 2019. A customer production deployment may be more distributed and highly-available.
-
Add Active Directory Federation Services Role to a Windows Server 2019 virtual machine (e.g.,
rpl-adfs01.rainpole.io==adfs.rainpole.io) -
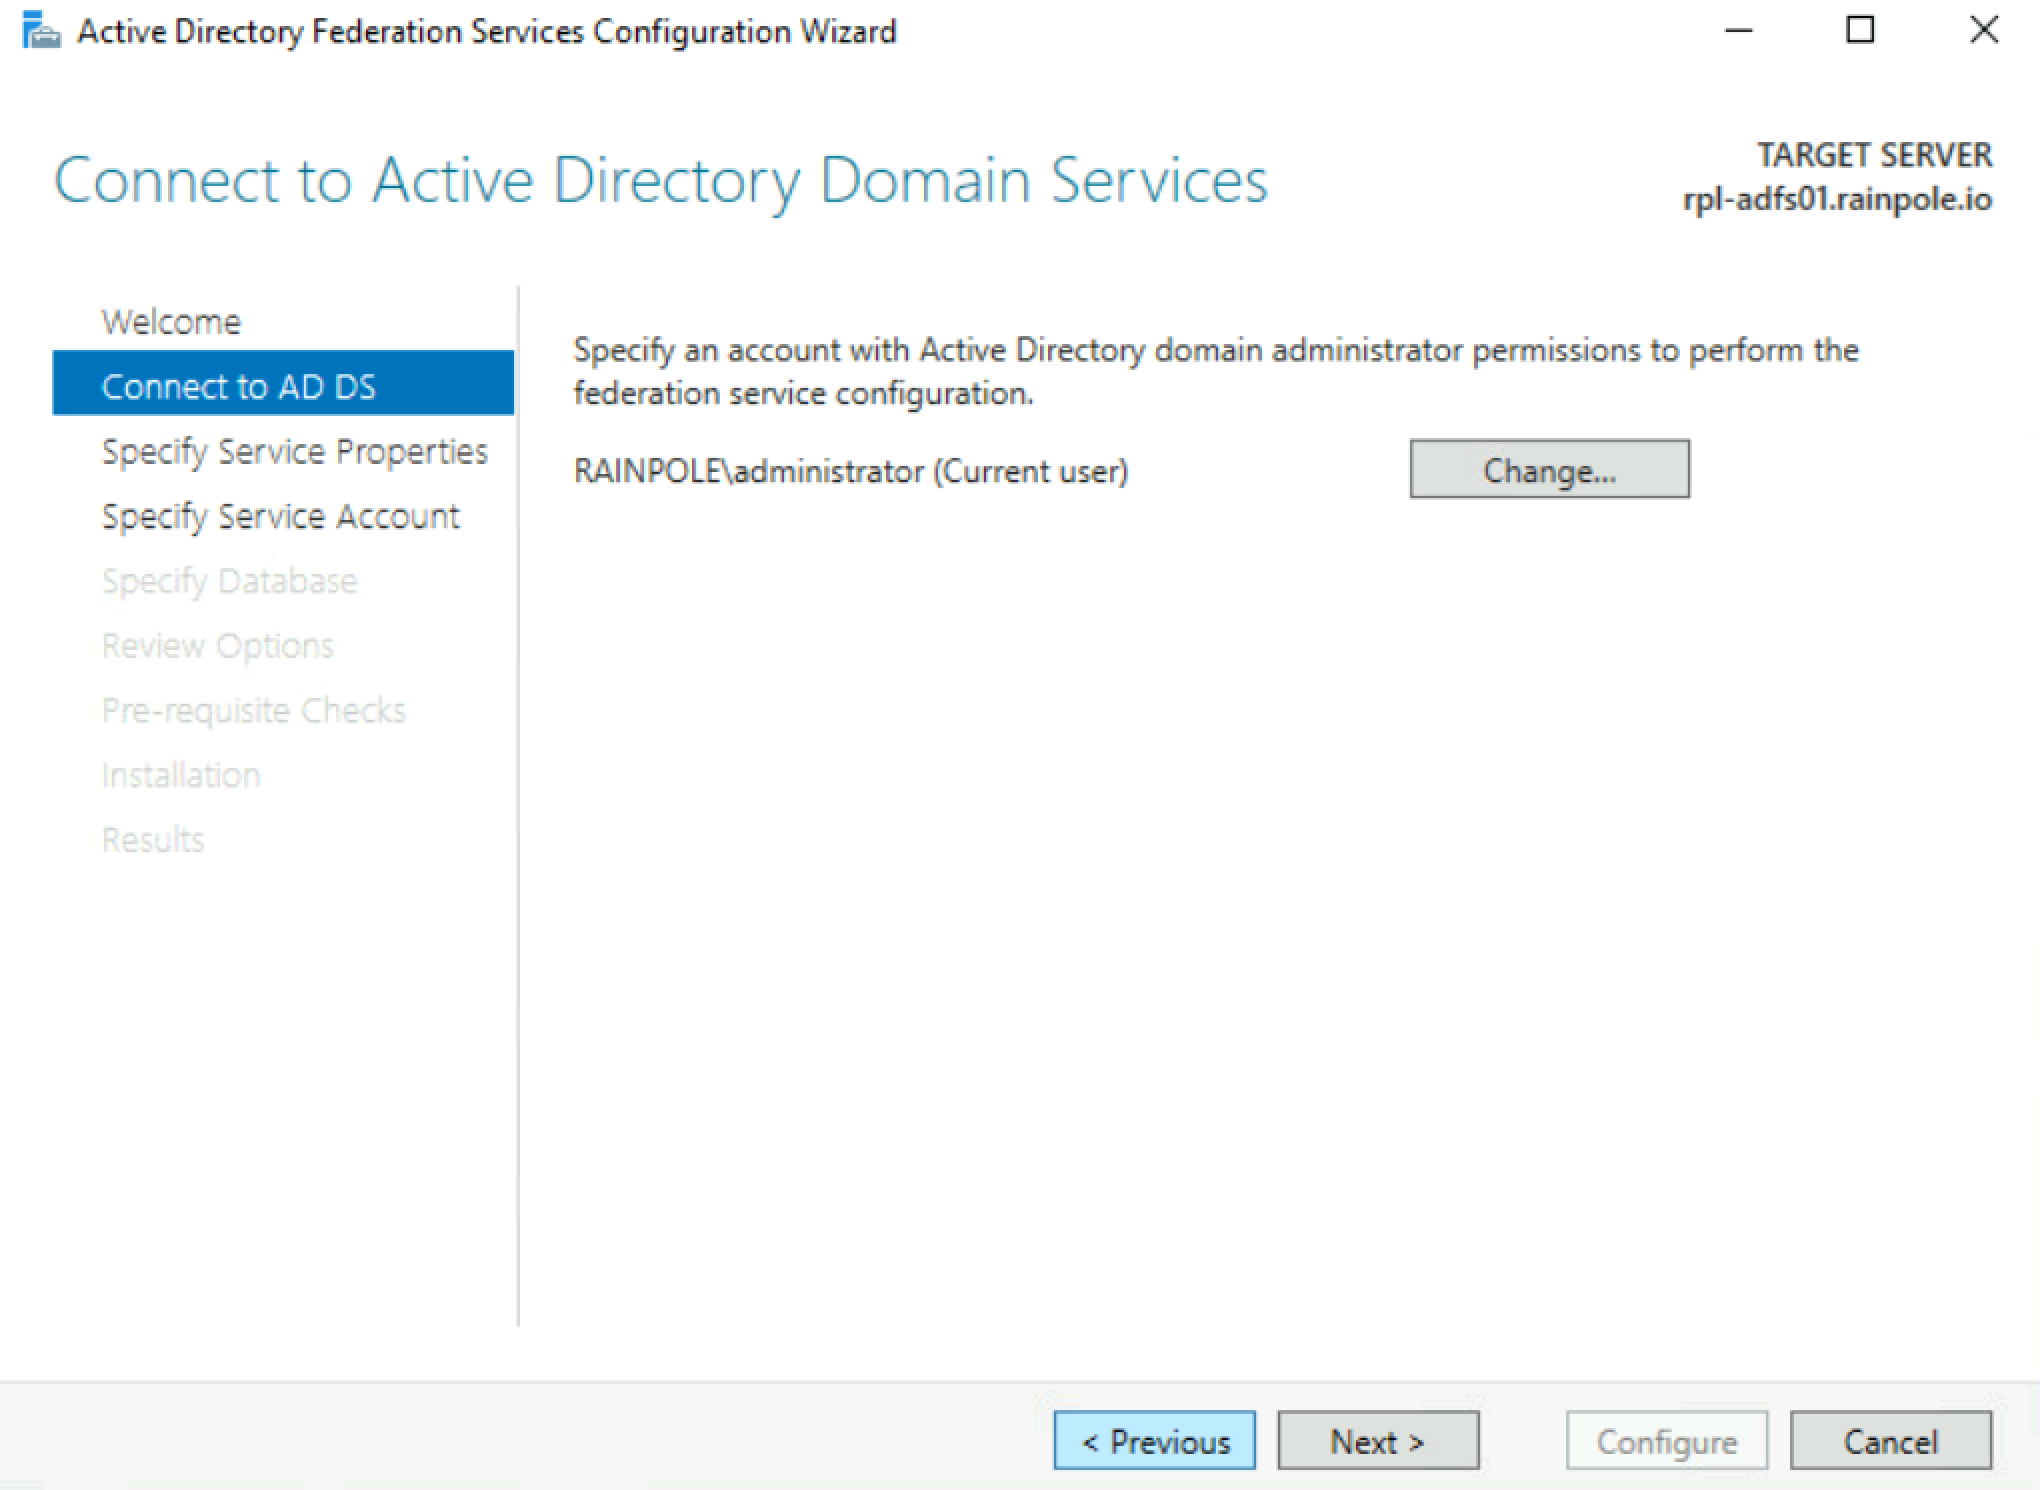
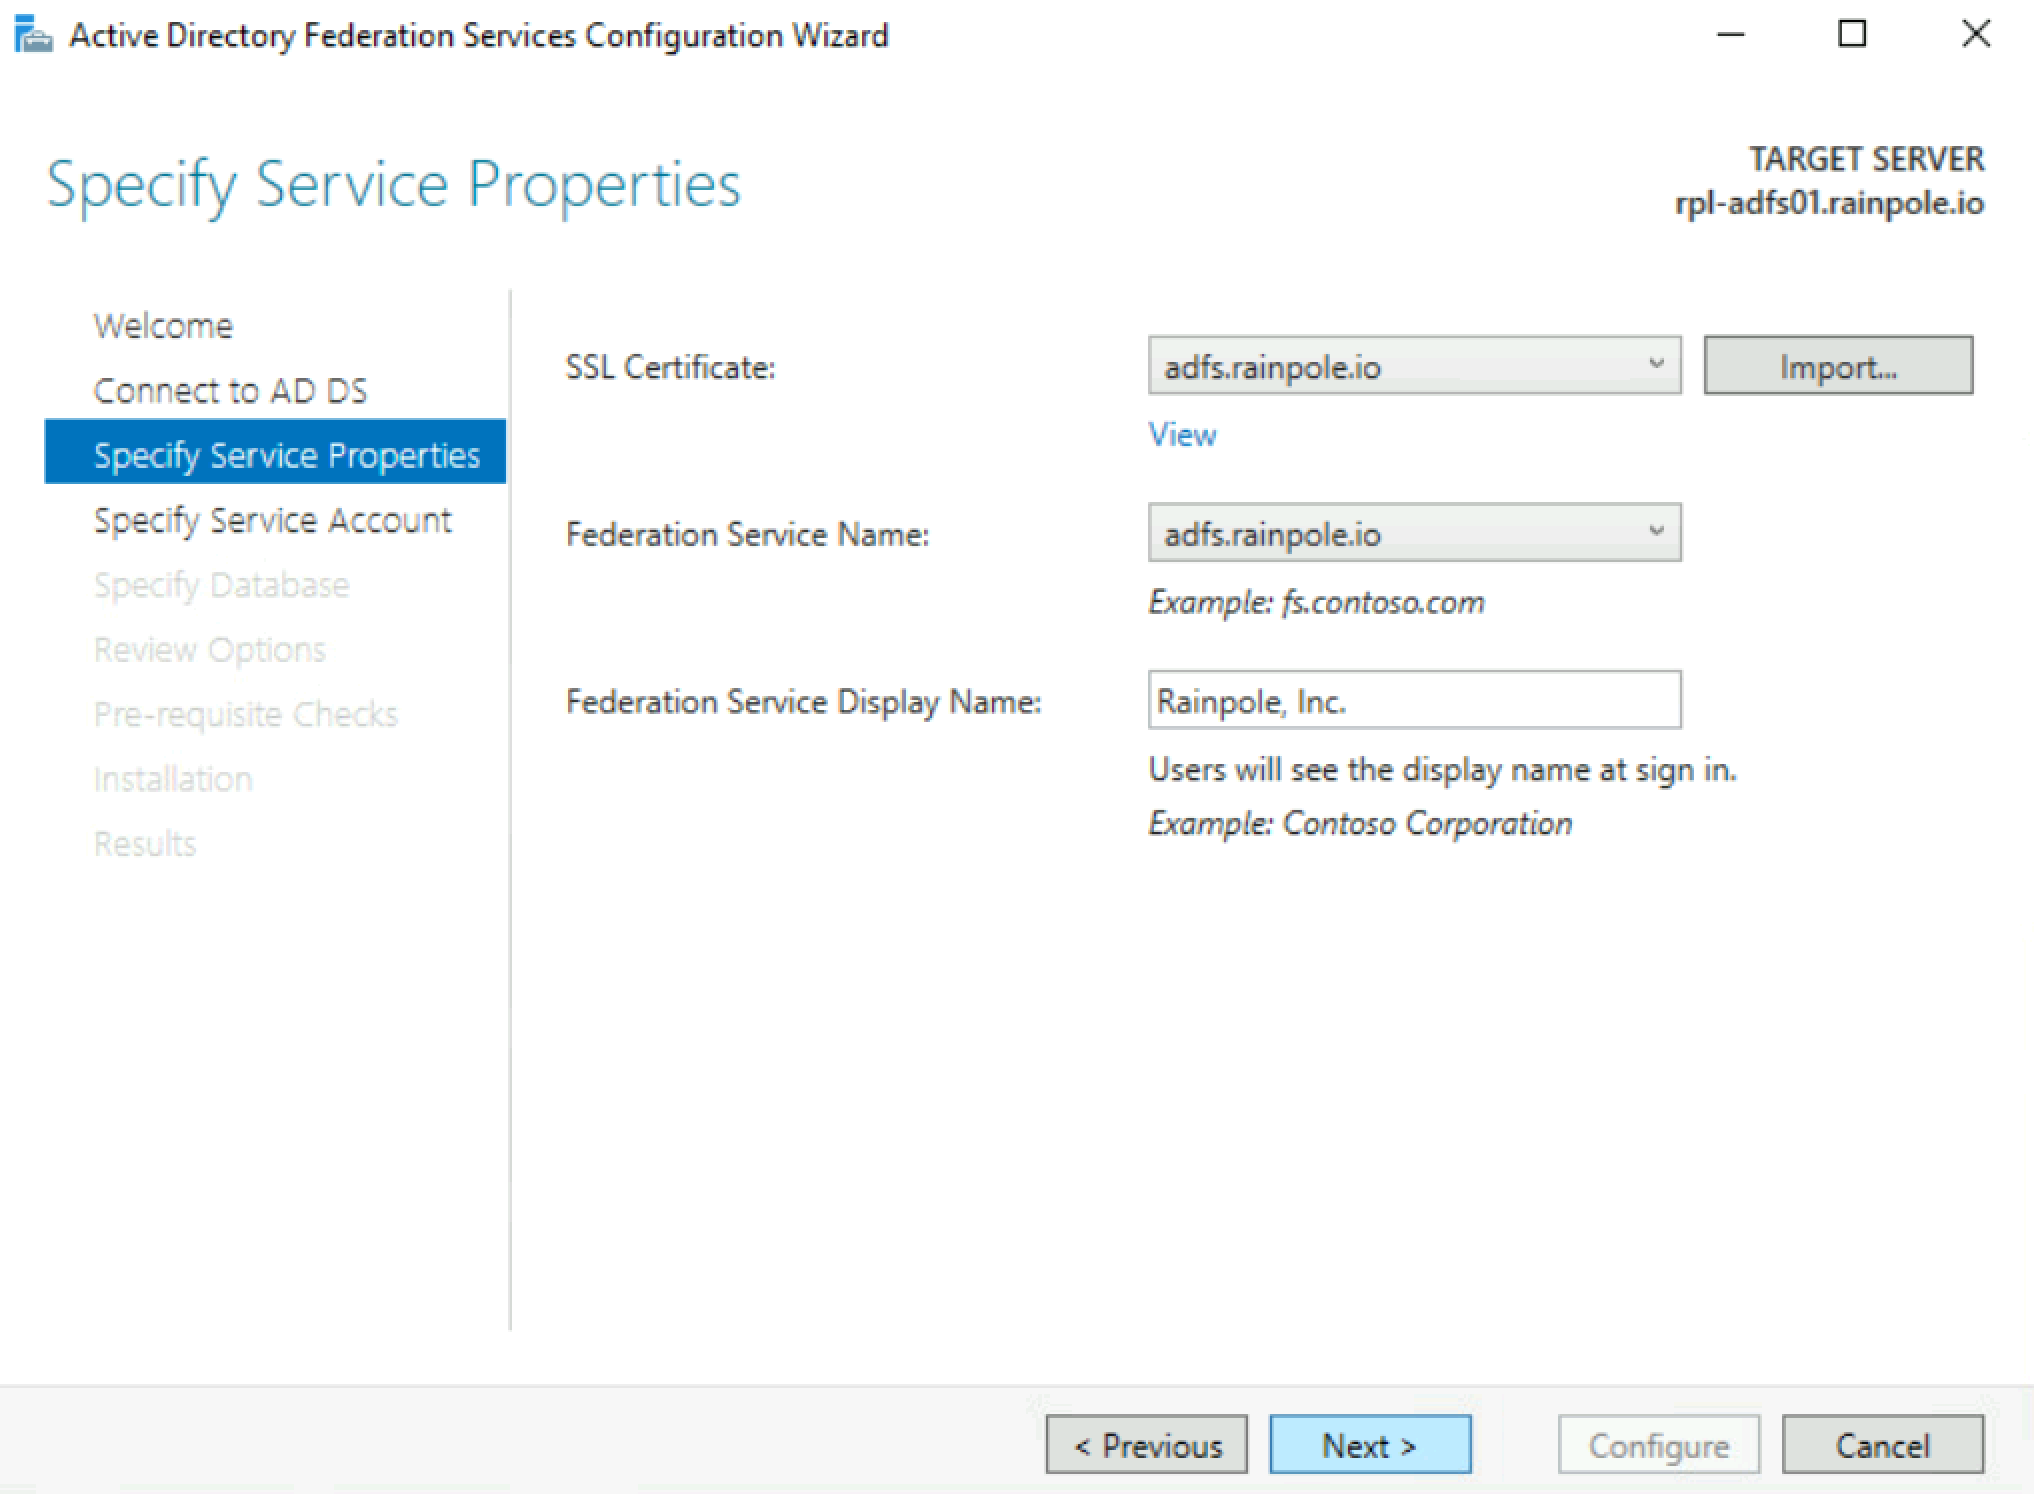
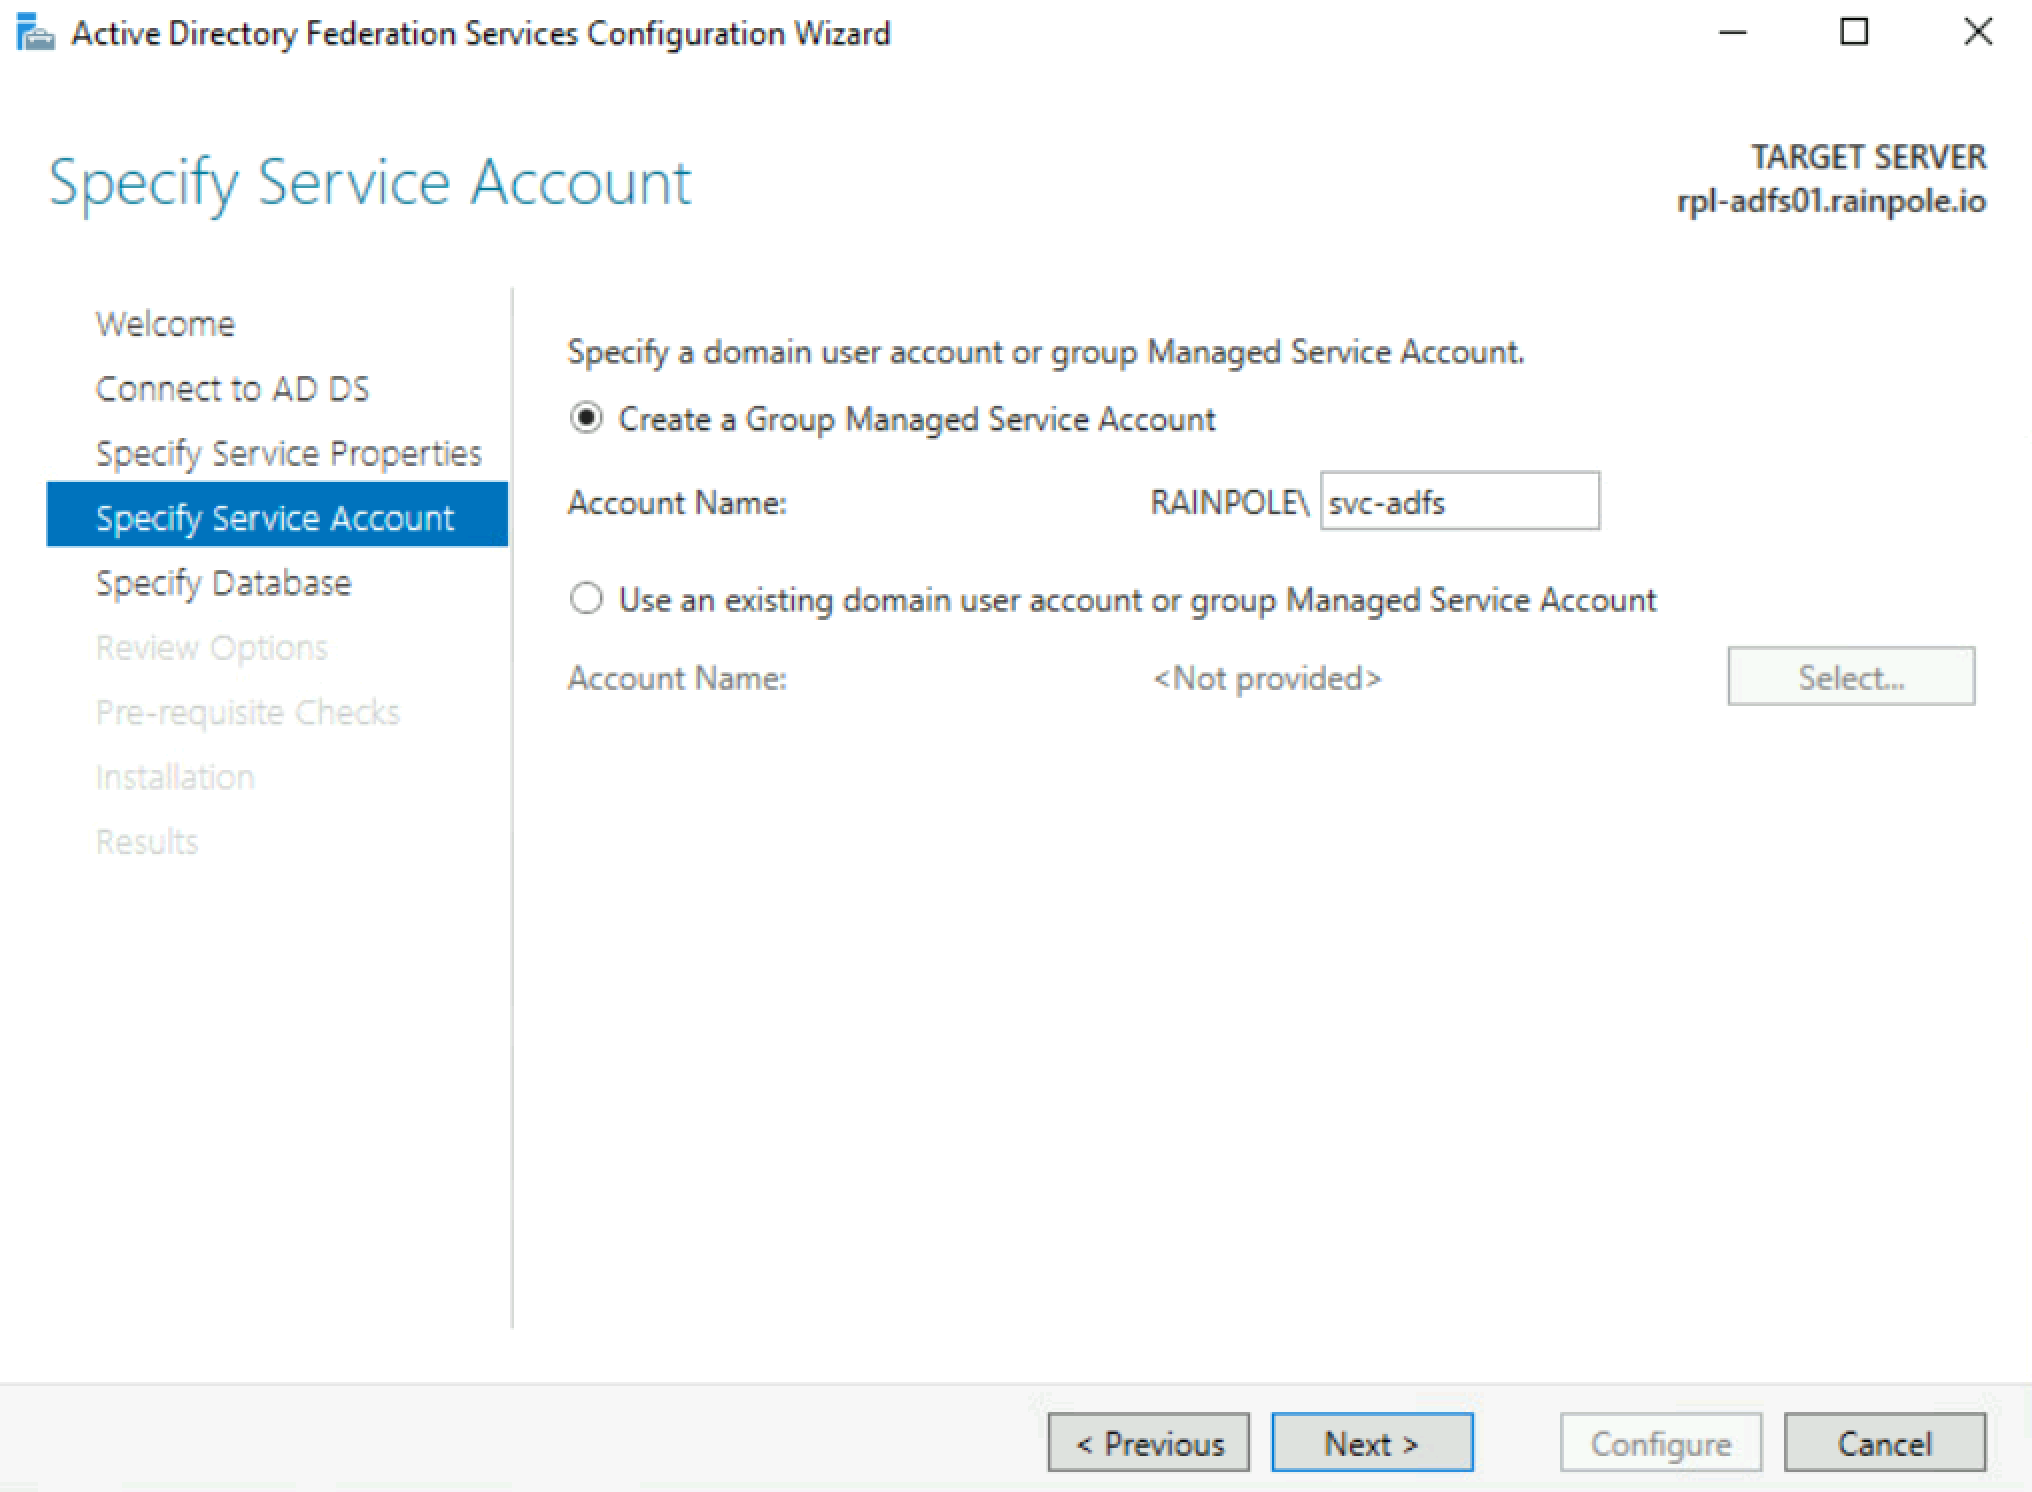
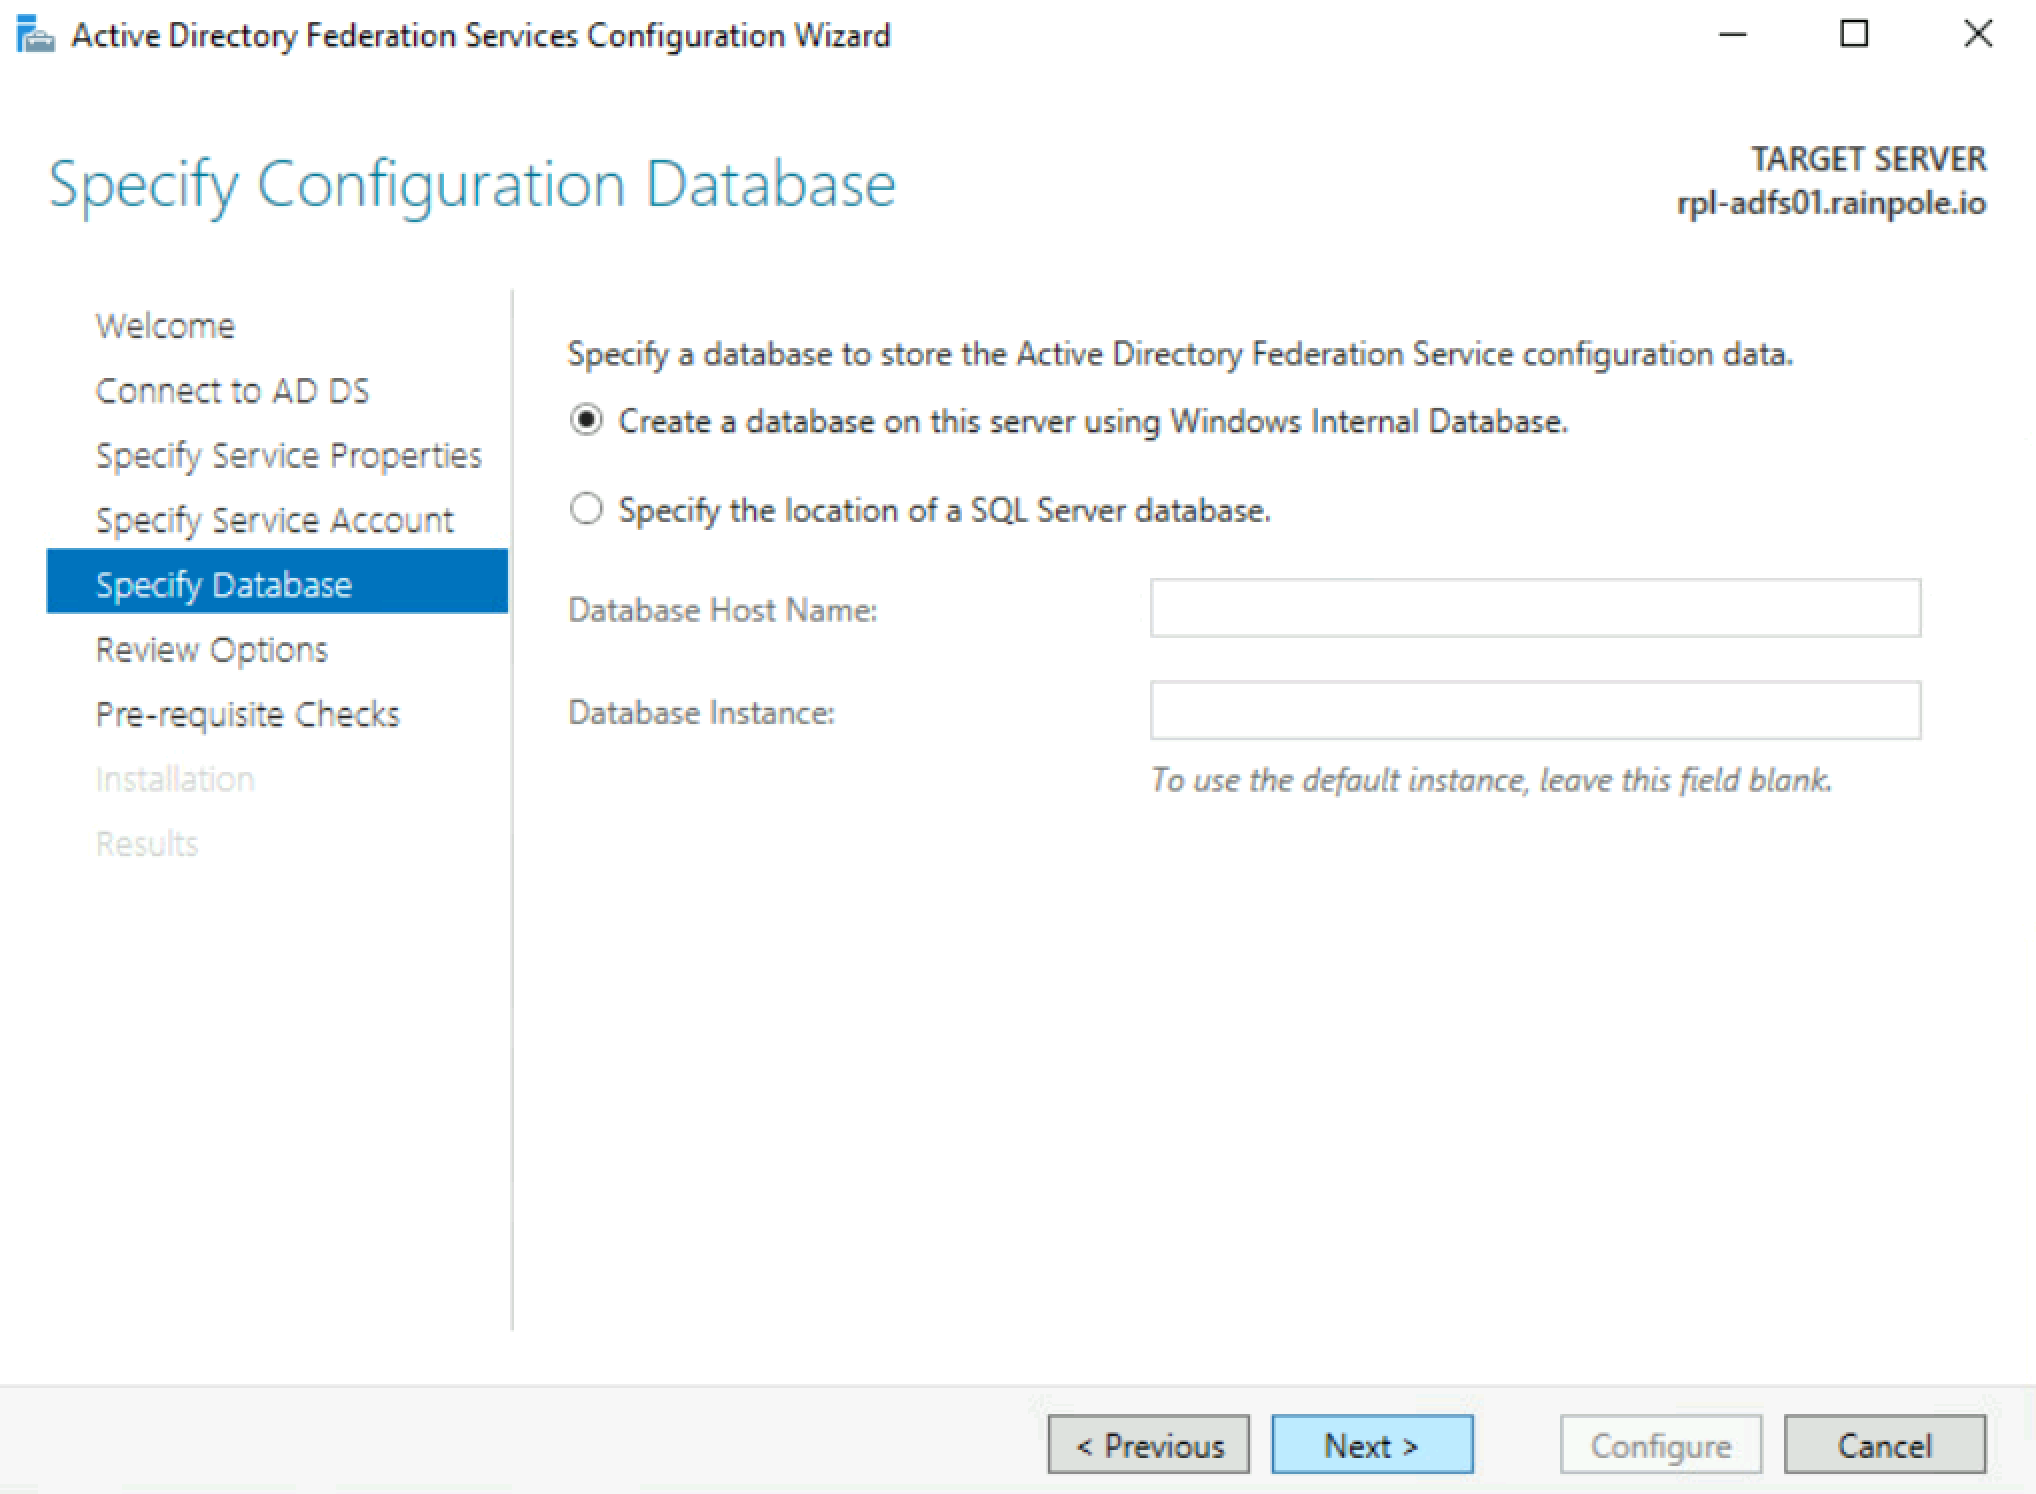
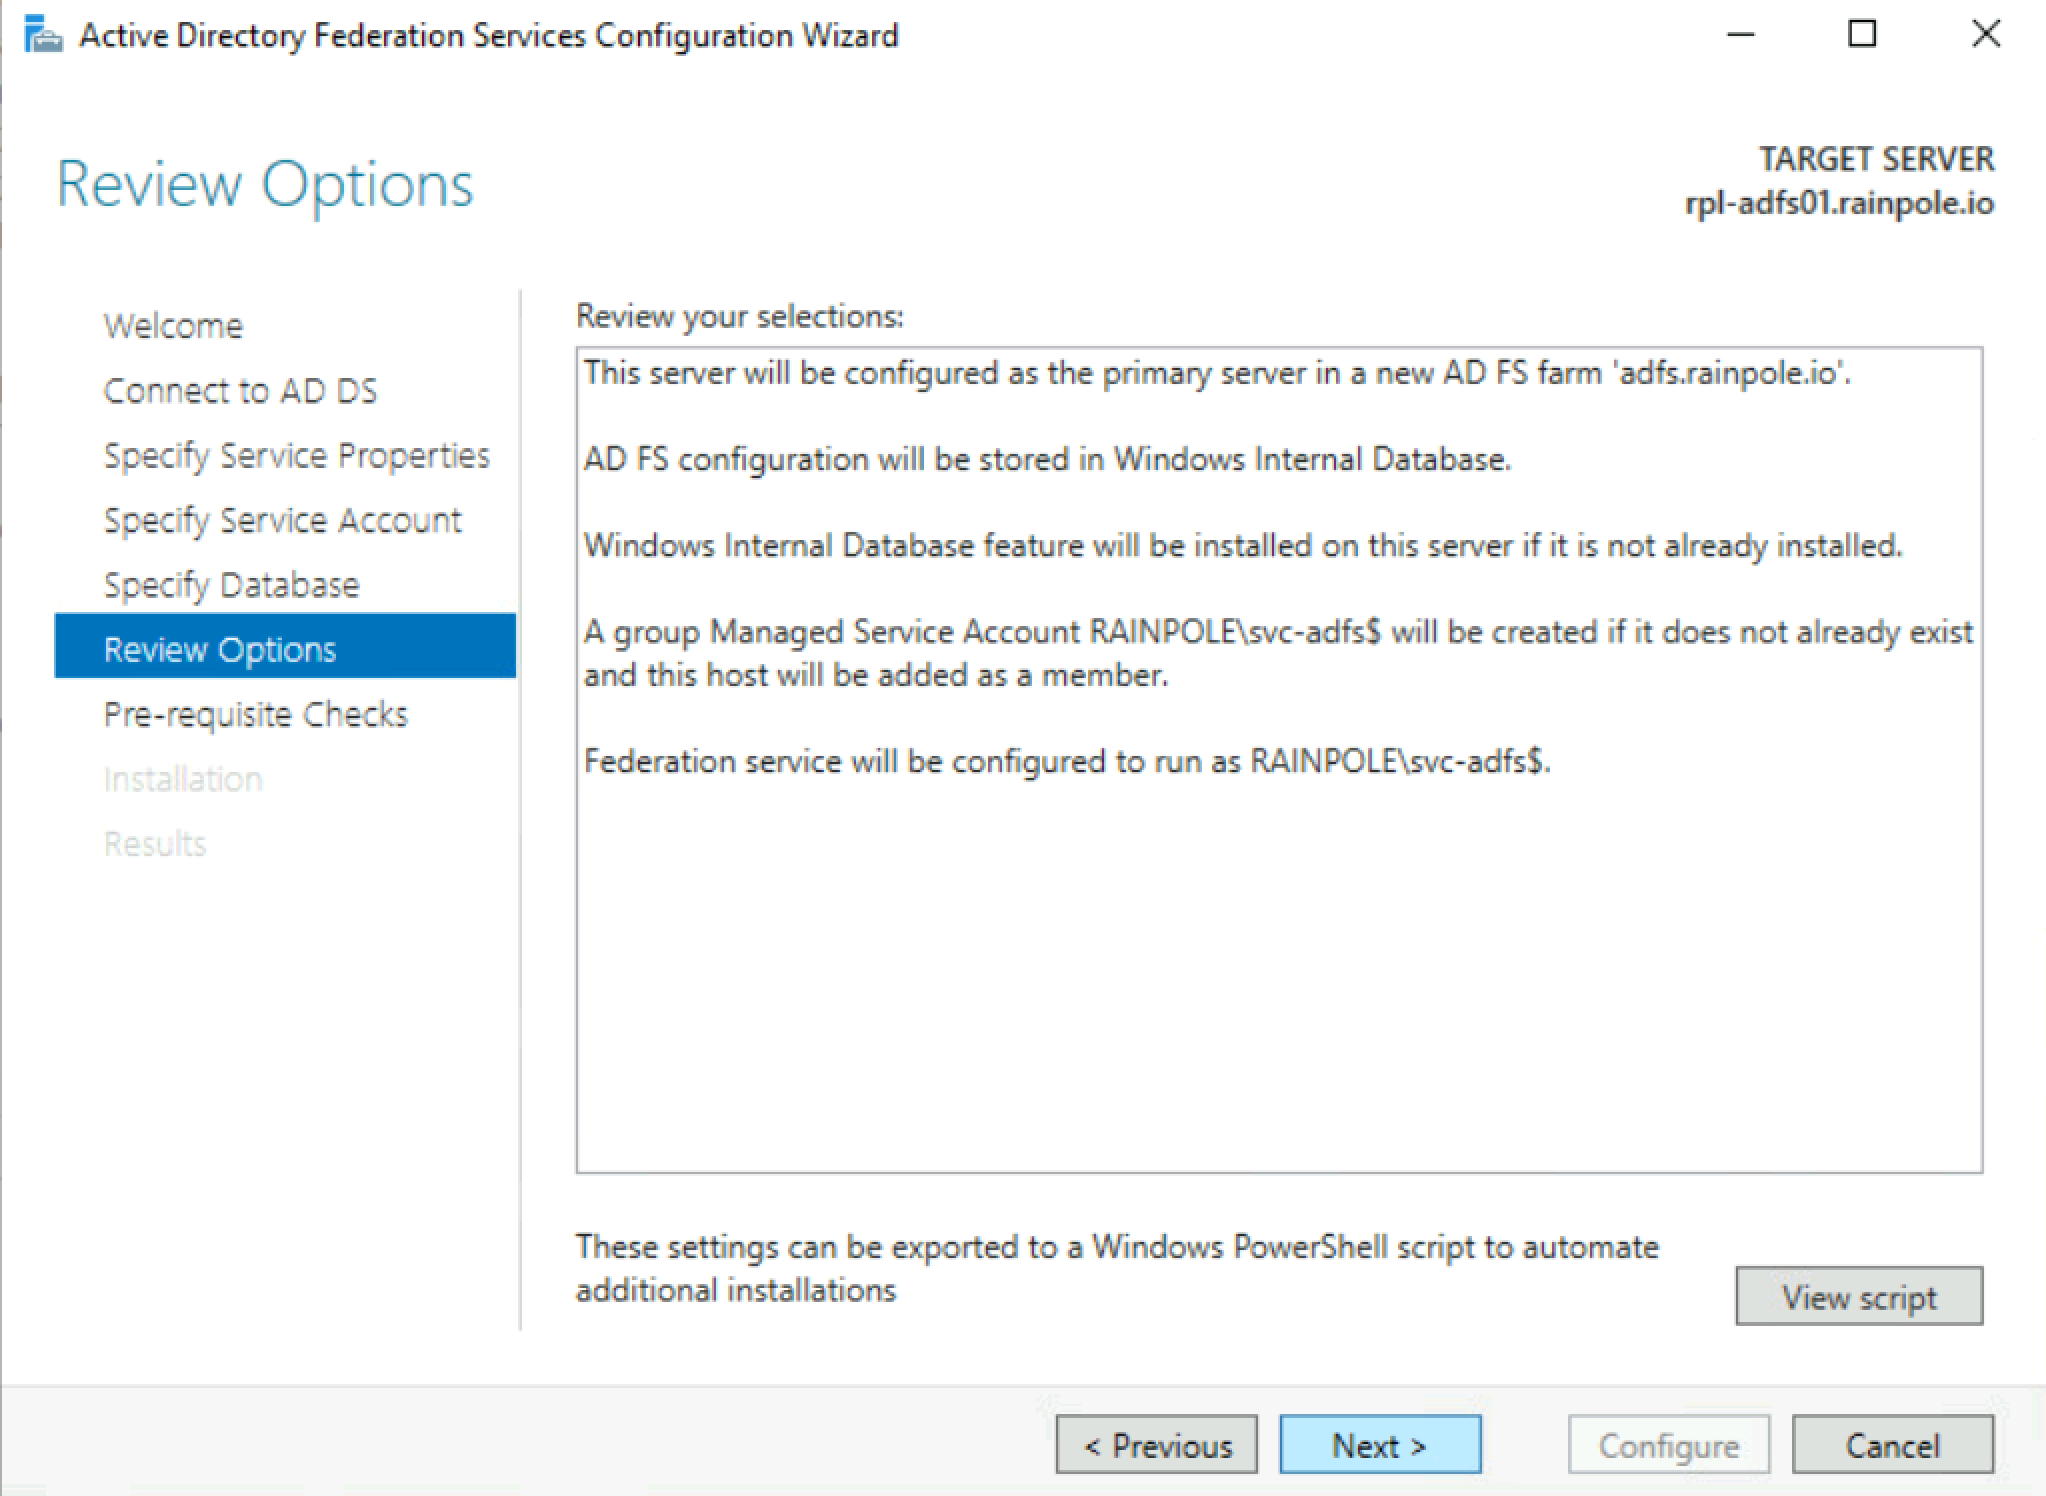
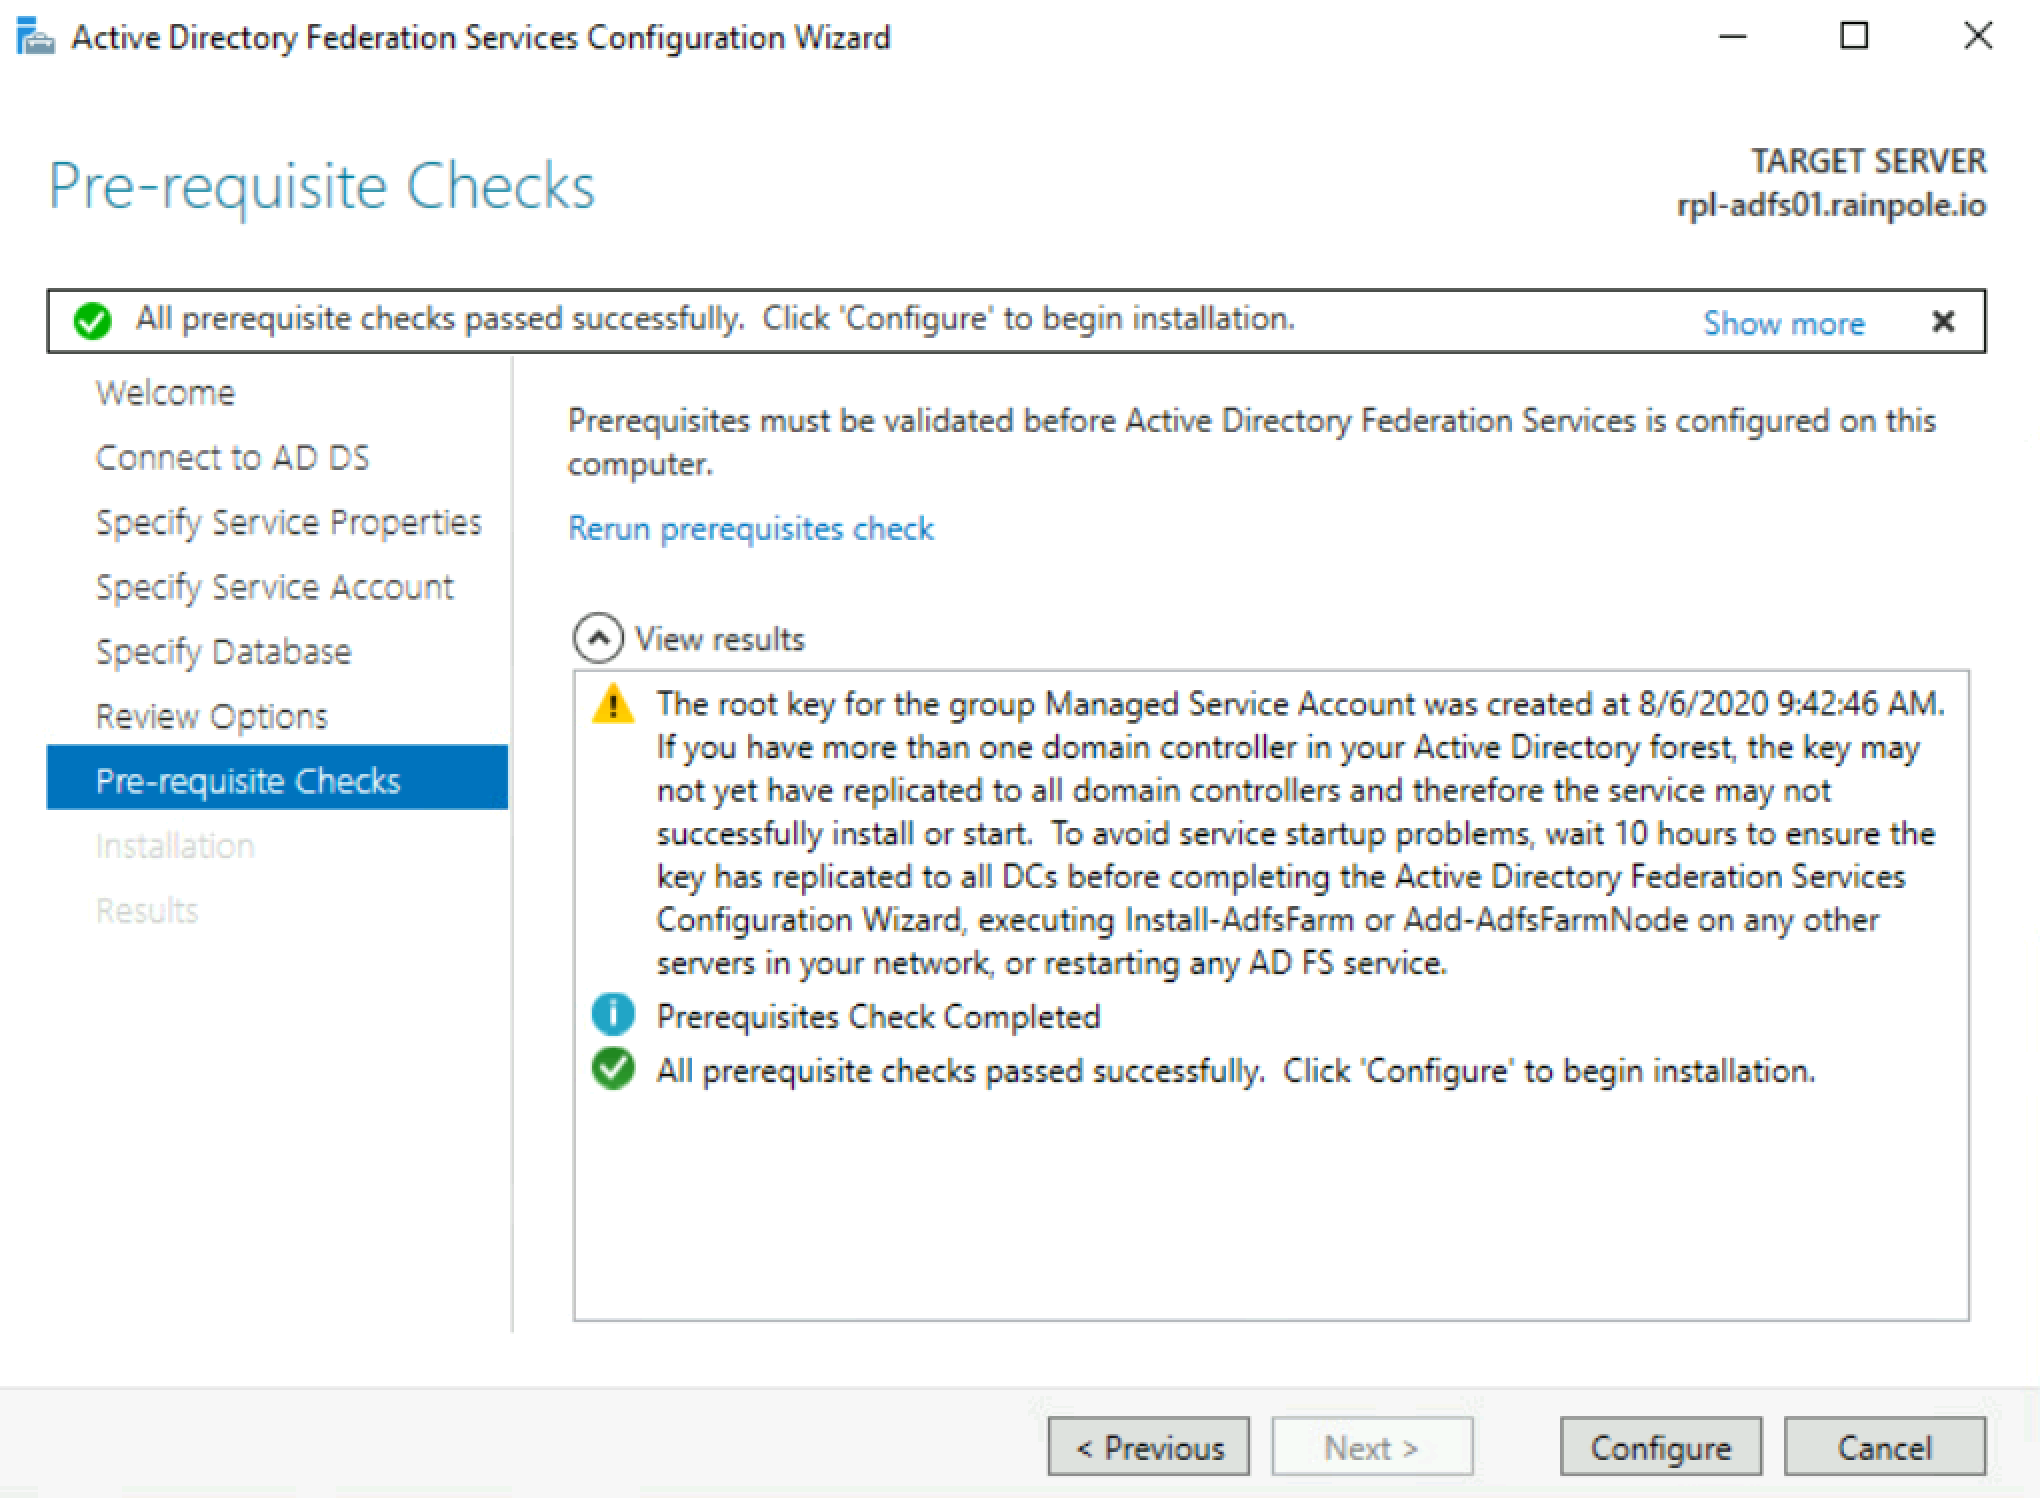
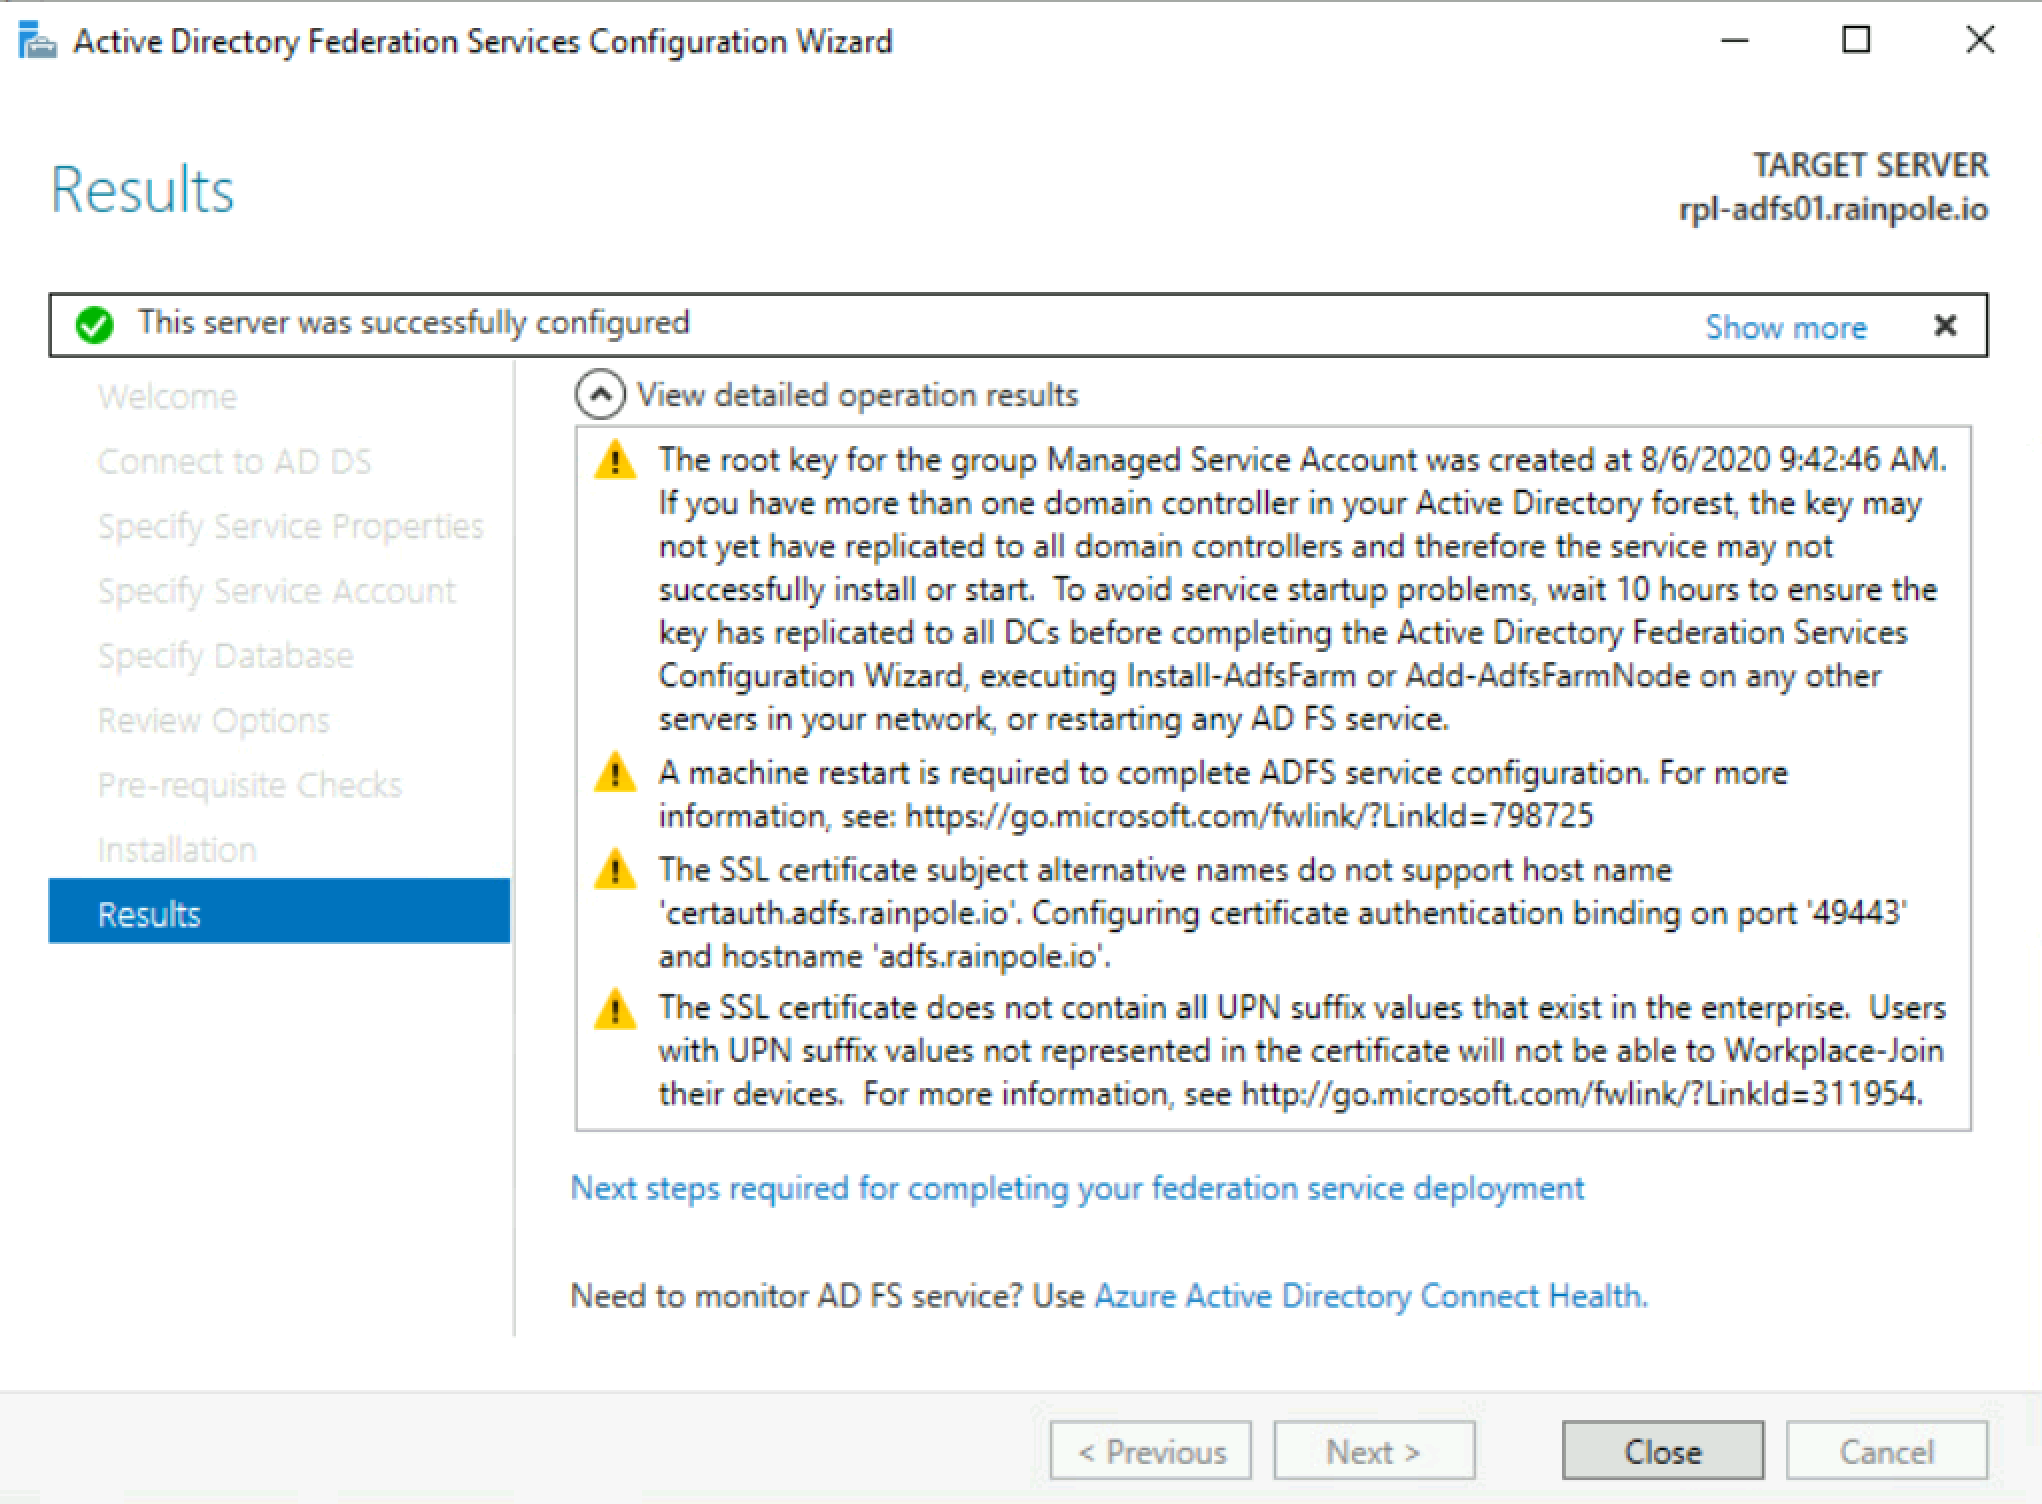
Configure Active Directory Federation Services.
Below are screenshots from a simple installation in a lab.


-
Verify that the Active Directory Federations services are accessible by accessing the
https://adfsFQDN/adfs/ls/IdpInitiatedSignon. (e.g.,https://adfs.rainpole.io/adfs/ls/IdpInitiatedSignon)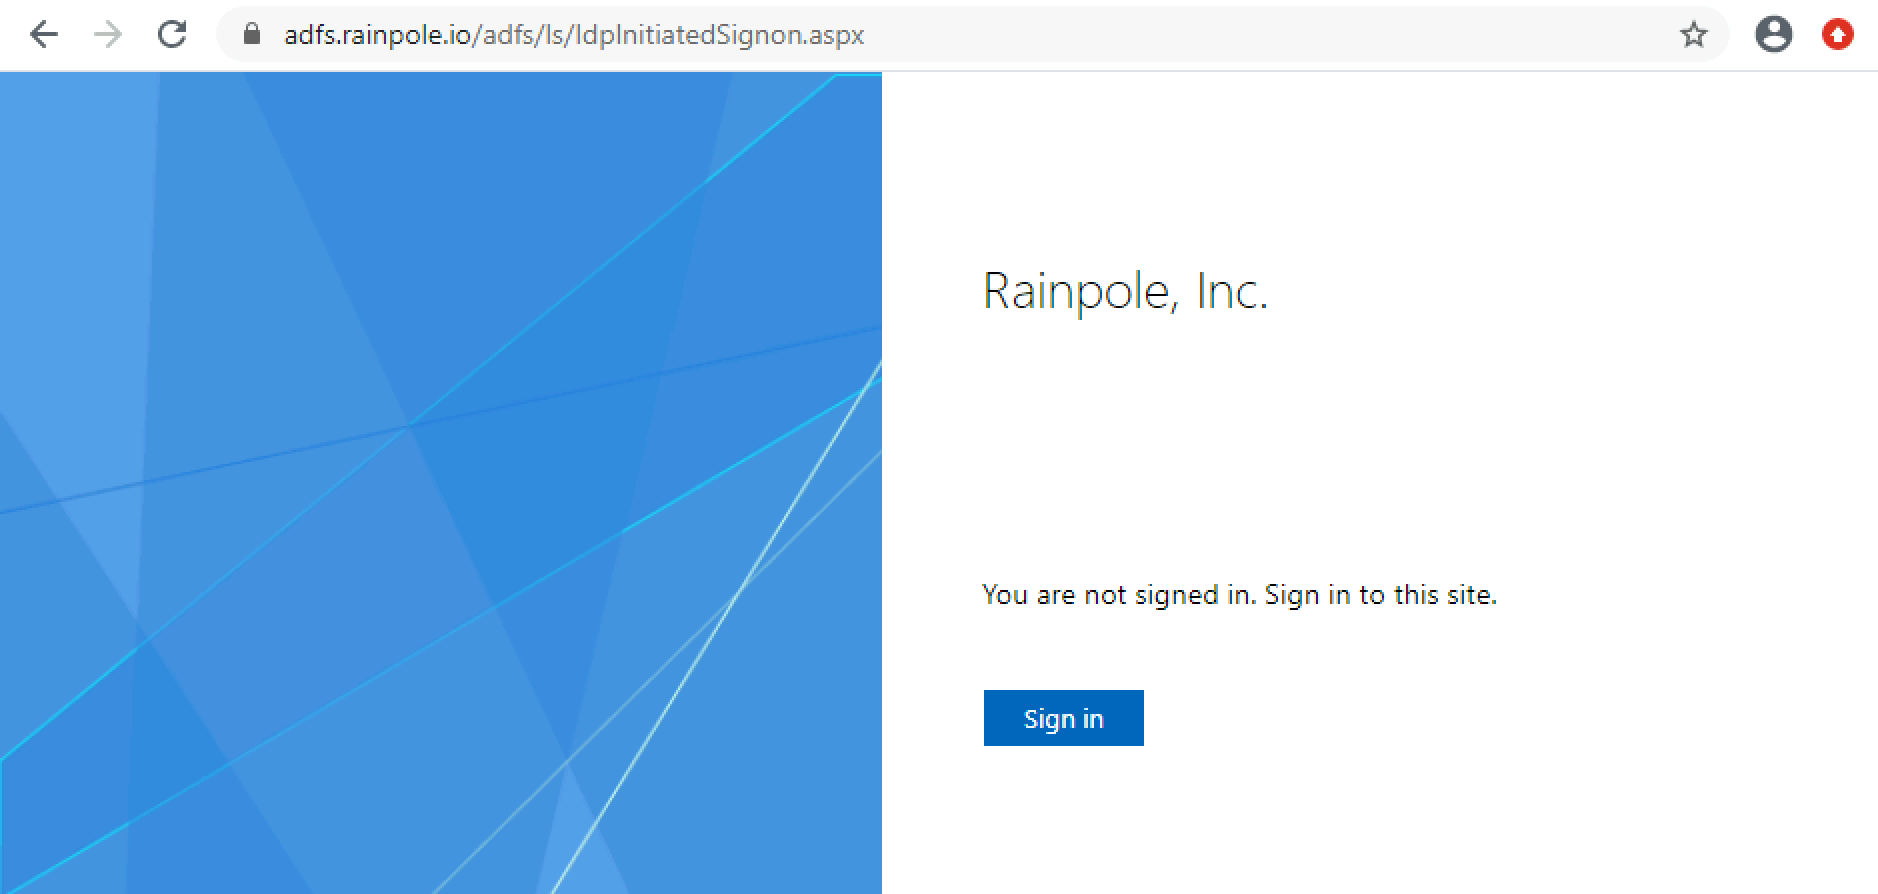
Configuring Microsoft Active Directory Federations Services on Microsoft Windows Server 2019
Prerequisites
- Active Directory Federations Services role is deployed and base configured.
Implementation
-
Download the Azure Centered UI from the Microsoft GitHub repository.
-
Extract to the Active Directory Federation Services instance (e.g.
C:\Rainpole\ADFS\Azure-CenteredUI\). -
Upload a custom Illustration of 1480px x 1080px (e.g.,
C:\Rainpole\ADFS\illustration.jpg). -
Upload a custom icon of 250px x 35px (e.g.,
C:\Rainpole\ADFS\logo.png). -
Set the parameters for the Active Directory Federation Services UX:
Set-AdfsGlobalWebContent –CompanyName "Rainpole"

Set-AdfsGlobalWebContent -HelpDeskLink https://support.rainpole.io -HelpDeskLinkText Support

Set-AdfsGlobalWebContent -HomeLink https://rainpole.io -HomeLinkText Home

Set-AdfsGlobalWebContent -PrivacyLink https://rainpole.io/privacy/ -PrivacyLinkText Privacy

Set-AdfsGlobalWebContent -SignInPageDescriptionText "Welcome to Rainpole."

Set-AdfsWebTheme -TargetName custom-centeredui -AdditionalFileResource @{Uri=/adfs/portal/script/paginatedOnload.js;;path="C:\Rainpole\ADFS\Azure-CenteredUI\paginatedOnload.js"}

Set-AdfsWebConfig -ActiveThemeName custom-centeredui

Set-AdfsWebTheme -TargetName custom-centeredui -Illustration @{path="C:\Rainpole\ADFS\illustration.jpg"}

Set-AdfsWebTheme -TargetName custom-centeredui -Logo @{path="C:\Rainpole\ADFS\logo.png"}
Now, that is pretty! :)
VMware vCenter Server 7.0
Configuring Microsoft Active Directory Federations Services for VMware vCenter Server 7.0
In order to establish a relying party trust between your vCenter Server and your Active Directory Federations Services provider, identifying information and a shared secret must be established between them. This is done by creating an OpenID Connect configuration in Active Directory Federations Services known as an Application Group, which consists of a Server application and a Web API. Both of these components together specify the vCenter redirect URIs that need to be invoked during authorization code flows as well as permissions, scopes, claims, and a client identifier and shared secret that vCenter Server uses to communicate with your Active Directory Federations Services server.
Obtain the vCenter Server Redirect URIs
-
In a Web browser, log in to vCenter Server by using the vSphere Client with an administrator-level account.
Setting Value URL https://sfo-m01-vc01.sfo.rainpole.io/uiUsername [email protected]Password vsphere_admin_password -
Navigate to the Configuration UI.
a. From the Home menu, select Administration.
b. Under Single Sign On, click Configuration.
-
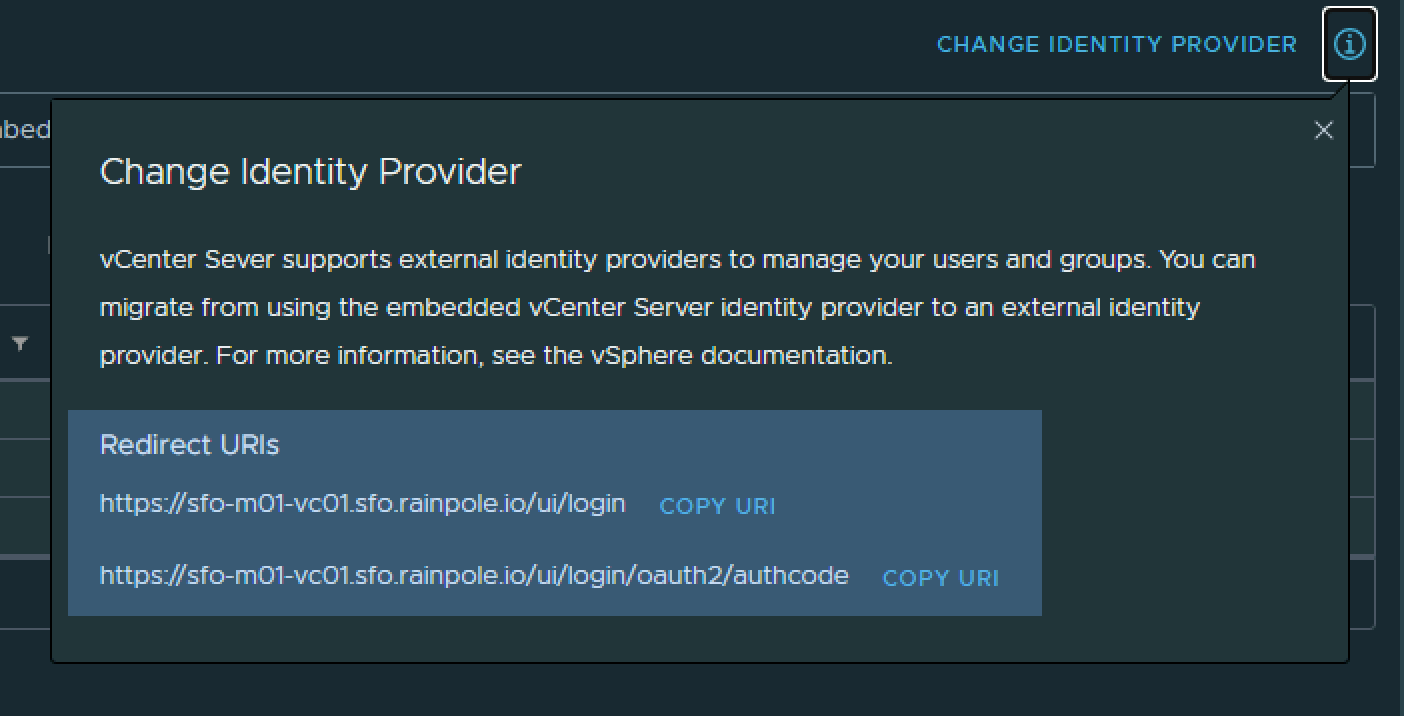
Select the Identity Provider tab and obtain the Redirect URIs.
a. Click the informational icon next to the "Change identity provider" link. Two Redirect URIs are displayed in the pop-up banner.
b. Save the two Redirect URIs. The Redirect URIs will be required in a later stage during the configuration of the Application Group in Active Directory Federation Services.
-
Close the pop-up banner.
-
Repeat the procedure to save the two Redirect URIs for each workload domain vCenter Server instance.
Create a Microsoft Active Directory Federation Services Application Group Configuration
Create an OpenID Connect configuration in Active Directory Federation Services and configure it for vCenter Server.
To establish a relying party trust between vCenter Server and an identity provider, you must establish the identifying information and a shared secret between them. In Active Directory Federation Services, you do so by creating an OpenID Connect configuration known as an Application Group, which consists of a Server application and a Web API. The two components specify the information that vCenter Server uses to trust and communicate with the Active Directory Federation Services server.
Note
Note the following when you create the Active Directory Federation Services Application Group:
- You need the two Redirect URIs you obtained and saved from the prior step.
- Save the following information to a file for use when configuring the vCenter Server Identity Provider.
- Client Identifier
- Shared Secret
- OpenID Configuration URL for Active Directory Federation Services
The steps to create an Application Group in Active Directory Federation Services.
-
Open the Active Directory Federation Services Management console ( Server Manager → Tools → Active Directory Federation Services Management).
-
Right-click Application Groups and select Add Application Group ; alternatively, select Application Groups and select Add Application Group from the list of available actions under the Action menu bar or the Actions pane.
-
Enter a Name (e.g., VMware Cloud Foundation Instance sfo-vcf01) and optionally a Description for the new application group.
-
In the Template list, under Client-Server applications, select the Server application accessing a web API type and click Next.
-
Save the results of the Client Identifier. The Client Identifier will be required in a later stage during the configuration of the vCenter Server Identity Provider configuration.
-
Enter the two vCenter Server Redirect URIs from the management domain and each workload domain that were previously saved from the vCenter Server Identity Provider Configuration page and click Next.
For example:
https://sfo-m01-vc01.sfo.rainpole.io/ui/loginhttps://sfo-m01-vc01.sfo.rainpole.io/ui/login/oauth2/authcodehttps://sfo-w01-vc01.sfo.rainpole.io/ui/loginhttps://sfo-w01-vc01.sfo.rainpole.io/ui/login/oauth2/authcodehttps://sfo-w02-vc01.sfo.rainpole.io/ui/loginhttps://sfo-w02-vc01.sfo.rainpole.io/ui/login/oauth2/authcode
-
Check the option to Generate a Shared Secret. Save the result of the shared secret and click Next. The Shared Secret will be required in a later stage during the configuration of the vCenter Server Identity Provider configuration.
-
Add an Identifier value that is equal to the Client Identifier generated previosuly and click Next.
-
Under Choose an Access Control Policy, select Permit Everyone and click Next.
-
On the Configure Application Permissions page, under Permitted Scopes, make sure openid and allatclaims are selected and click Next.
-
Review the Summary page and click Next to create the Application Group in Active Directory Federation Services.
-
Click Close to complete the Application Group wizard.
Result
The Application Group is now created.
To populate the user tokens with the appropriate information during OAuth exchanges, additional configuration steps are needed to transform Active Directory data into token claims.
-
Right-click the newly created Application Group and select Properties; alternatively, select the newly created Application Group and select Properties from the list of available actions under the Action menu bar or the Actions pane.
-
Select the Web API entry under Applications and click Edit.
-
Go to the Issuance Transform Rules tab and add each of the following three rules.
Token-Group Claim Rule
-
Click Add Rule
-
Under Claim rule template, select the option Send LDAP Attributes as Claims and click Next.
-
Enter a Name for the claim rule such as Qualified by Long Domain Name.
-
Under Attribute store, select Active Directory.
-
In the mapping table on the first row, under the LDAP Attribute column, select the Token-Groups - Qualified by Long Domain Name option.
-
In the mapping table on the same row, under the Outgoing Claim Type column, select the Group option and click Finish.
Subject Claim Rule
-
Click Add Rule.
-
Under Claim rule template, select the option Send LDAP Attributes as Claims and click Next.
-
Enter a Name for the claim rule such as Subject.
-
Under Attribute stor e, select Active Directory.
-
In the mapping table on the first row, under the LDAP Attribute column, select the User-Principal-Name option.
-
In the mapping table on the same row, under the Outgoing Claim Typ e column, select the Name ID option and click Finish.
User Principal Name Claim Rule
-
Click Add Rule
-
Under Claim rule template, select the option Send LDAP Attributes as Claims and click Next.
-
Enter a Name for the claim rule such as User Principal Name.
-
Under Attribute store, select Active Directory.
-
In the mapping table on the first row, under the LDAP Attribute column, select the User-Prinicipal-Name option.
-
In the mapping table on the same row, under the Outgoing Claim Type column, select the UPN option and click Finish.
-
-
Click OK to save and close the updated Web API properties.
-
Click OK once more to close the Application Group properties.
Obtain the Microsoft Active Directory Federation Services OpenID Configuration URL
To configure Active Directory Federation Services on your vCenter Server, you will need to know your Active Directory Federation Services OpenID Configuration URL. This is the standard OpenID Connect (OIDC) Discovery Endpoint that advertises OIDC metadata information about an OAuth identity provider.
It is a well-known address that is typically the issuer endpoint concatenated with the path /.well-known/openid-configuration.
For example: https://adfs.rainpole.io/adfs/.well-known/openid-configuration.
To obtain the OpenID Address for your Active Directory Federation Services:
-
Open As as administrator, a PowerShell terminal on your Active Directory Federation Services server.
-
Run the following command:
-
Copy and save the results of the returned URL value. Select only the URL portion of the return value. The URL will be required in a later stage during the configuration of the vCenter Server Identity Provider configuration.
Configuring VMware vCenter Server 7.0 Update 1 (or later) with Microsoft Active Directory Federation Services
Prerequisites
-
Microsoft Active Directory Federation Services are deployed and operational.
-
The Application Group in configured in Microsoft Active Directory Federation Services.
- The OpenID Configuration URL is available.
- The vCenter Server certificate has been replaced with a certificate authority-signed certificate using SDDC Manager.
Import the Certificate for Microsoft Active Directory Federation Services to the vCenter Server
Starting in vSphere 7.0 Update 1, you can register the certificate to the Trusted Root Certificates Store (also called the VMware Endpoint Certificate Store, or VECS) instead of importing to the Java Keystore required for vSphere 7.0. The Java Keystore will continue to function, however, vCenter Server is standardizing on using the Trusted Root Certificates Store.
-
Log in with the vSphere Client to the vCenter Server.
Setting Value FQDN sfo-m01-vc01.sfo.rainpole.ioUsername [email protected]Password sso_admim_password -
Navigate to Administration > Certificates > Certificate Management.
-
Next to Trusted Root Certificates, click Add.
-
Browse for the Microsoft Active Directory Federation Services root certificate and click Add.
Result
The certificate is added in a panel under Trusted Root Certificates.
Configure the Active Directory Federation Services as an Identity Provider
-
In a Web browser, log in to vCenter Server by using the vSphere Client with an administrator-level account.
Setting Value URL https://sfo-m01-vc01.sfo.rainpole.io/uiUsername [email protected]Password vsphere_admin_password -
Navigate to the Configuration UI. a. From the Home menu, select Administration. b. Under Single Sign On, click Configuration.
-
Select the Change Identity Provider.
Result
The Configure Main Identity Provider wizard opens.
-
Select Microsoft ADFS and click Next.
-
Enter the saved information for the following and click Next.
- Client Identifier
- Shared Secret
-
OpenID ID Address for Active Directory Federation Services.
a. Enter user and group information for the Active Directory over LDAP connection to search for users and groups and click Next
Option Example Value Base Distinguished Name for Users OU=Security Users,DC=rainpole,DC=ioBase Distinguished Name for Groups OU=Security Groups,DC=rainpole,DC=ioUsername [email protected]Password svc-vsphere-ad\_passwordPrimary Server URL ldaps://sfo-m01-ad01.sfo.rainpole.io:3269Secondary Server URL ldaps://sfo-m01-ad02.sfo.rainpole.io:3269SSL Certificates Select a certificate.b. Click Finish to complete the wizard.
Configure Global Permissions Using Active Directory Federation Services as an Identity Provider
Assign global permissions to an Active Directory group in vCenter Server via Microsoft Active Directory Federation Services. You can later assign access to users by adding them to that group.
-
In a Web browser, log in to vCenter Server by using the vSphere Client.
Setting Value URL https://sfo-m01-vc01.sfo.rainpole.io/uiUsername [email protected]Password vsphere_admin_password -
Select Menu > Administration.
-
Under Access Control, select Global Permissions.
-
On the Global Permissions page, click Add Permission.
-
In the Add Permission dialog box, enter the settings and click OK.
Setting Value Domain Microsoft ADFS User/Group ug-vc-adminsRole Administrator Propagate to children Selected -
Verify logging in to vCenter Server with a user that is a member of the Active Directory security group (e.g.,
rainpole.io\ug-vc-admins) in via Microsoft Active Directory Federation Services.
This concludes the integration of Active Directory Federation Services as a federated identity provider for VMware vCenter Server.
- Configure of vSphere identity and access (roles and permissions) continue as usual.
- Repeat for each workload domain.
Workspace ONE Access for NSX-T Data Center and vRealize Suite
Configuring Microsoft Active Directory Federation Services in VMware Workspace ONE Access as a 3rd Party Identity Provider
Configure a Directory in Workspace ONE Access
Prerequisites
- Microsoft Active Directory Federation Services are deployed and operational.
- Workspace ONE Access is deployed and configured.
You add you Active Directory with the requisite Workspace ONE Access and configure attributes to synchronize users and groups to enable identity and access management in the SDDC.
-
In a Web browser, log in to the region-specific Workspace ONE Access instance by using the administration interface.
Setting Value URL https://auth.sfo.rainpole.io/adminhttps://auth.rainpole.io/adminUsername adminPassword wsa_admin_passwordDomain System Domain -
On the main navigation bar, click Identity and access management.
-
Click the Directories tab, and from the Add directory drop-down menu, select Active Directory over LDAP/IWA.
Result
The Add directory wizard opens.
-
On the Add directory page, configure the settings, and click Save and Next.
Setting Value Directory name rainpole.ioActive Directory over LDAP Selected Sync connector Select ConnectorsDirectory search attribute sAMAccountNameBase DN DC=rainpole,DC=ioBind DN CN=svc-wsa-ad,OU=Service Accounts,DC=rainpole,DC=ioBind user password svc-wsa-ad_password -
Repeat for additional domains. (e.g.,
sfo.rainpole.io) -
On the Map user attributes page, review the attribute mappings, and click Next.
-
On the Select the groups you want to sync page, configure the settings.
Setting Value Sync nested group members Selected Specify the group DN OU=Security Groups,DC=rainpole,DC=io -
For each Group DN, click Select, select the group to use by the Workspace ONE Access instance, and click Next.
Region-Specific Workspace ONE Access
Product Value Workspace ONE Access ug-wsa-adminsug-wsa-directory-adminsug-wsa-read-onlyNSX-T Data Center ug-nsx-enterprise-adminsvRealize Log Insight ug-vrli-adminsug-vrli-usersug-vrli-viewersCross-Specific Workspace ONE Access Cluster
Product Value Workspace ONE Access ug-wsa-adminsug-wsa-directory-adminsug-wsa-readonlyvRealize Suite Lifecycle Manager ug-vrslcm-adminsug-vrslcm-content-managersug-vrslcm-content-developersvRealize Operations ug-vrops-adminsug-vrops-content-adminsug-vrops-read-onlyvRealize Automation ug-vra-org-ownersug-vra-cloud-assembly-adminsug-vra-cloud-assembly-usersug-vra-service-broker-adminsug-vra-service-broker-usersug-vra-orchestrator-adminsug-vra-orchestrator-designersug-vra-project-admins-sampleug-vra-project-users-sample
-
-
On the Select the users you want to sync page, configure the settings, and click Next.
Setting Value Specify the user DN OU=Security Users,DC=rainpole,DC=io -
On the Review page, click Edit, from the Sync frequency drop-down menu, select Every 15 minutes, and click Save.
-
To initialize the directory import, click Sync directory.
Obtain the VMware Workspace ONE Access SP Metadata
Active Directory Federation Services requires the VMware Workspace ONE Access service provider (SP) metadata for federation. The SP metadata is an XML file that describes the capabilities and requirements of VMware Workspace ONE Access as a trusted service provider.
-
In a Web browser, log in to the region-specific Workspace ONE Access instance by using the administration interface.
Setting Value URL https://auth.sfo.rainpole.io/adminhttps://auth.rainpole.io/adminUsername adminPassword wsa_admin_passwordDomain System Domain -
Select the Catalog > Web Apps tab.
-
Click Settings and then select SAML Metadata.
-
Under the SAML Metadata section, next to Service Provider (SP) metadata, click Copy URL to copy the SP metadata URL. Save the Service Provider (SP) metadata content.
-
Close the Settings page.
Add Active Directory Federation Services as an Identity Provider in Workspace ONE Access
To configure the Active Directory Federation Services integration, you must add Active Directory Federation Services as an identity provider instance in VMware Workspace ONE Access.
-
Download the federation metadata file for the Active Directory Federation Services endpoint at
/FederationMetadata/2007-06/FederationMetadata.xml. (e.g.,https://adfs.rainpole.io/FederationMetadata/2007-06/FederationMetadata.xml).Save the Federation metadata.
-
In a Web browser, log in to the Workspace ONE Access instance by using the administration interface.
Setting Value URL https://auth.sfo.rainpole.io/adminhttps://auth.rainpole.io/adminUsername adminPassword wsa_admin_passwordDomain System Domain -
Select the Identity & Access Management tab. Click Manage, and then click Identity Providers.
-
Click Add Identity Provider and select Create Third Party IDP.
-
Modify the configuration settings.
Setting Example Values Identity Provider Name ADFSSAML Metadata a. Paste the contents of the Active Directory Federation Servicws Federation Metadata. b. Click Process IdP Metadata.
The Name ID format mappings are automatically imported from the metadata.Just-in-Time User Provisioning Do not enable. Users rainpole.iosfo.rainpole.ioNetwork Select the network ranges for the users, based on their IP addresses, that you want to direct to Active Directory Federation Services for authentication. (e.g., ALL RANGES) Authentication Methods a. Authentication Methods, enter ADFS - SAML Passwordb. SAML Context, select urn:oasis:names:tc:SAML:2.0:ac:classes:PasswordSingle Sign-Out Configuration Do not enable. -
Click Add.
You have completed the configuration of Active Directory Federation Services as a trusted identity provider for Workspace ONE Access. You must configure Workspace ONE Access as a trusted relying party for Active Directory Federation Services.
Add VMware Workspace ONE Access as a Relying Party for Active Directory Federation Services
To add VMware Workspace ONE Access to the Active Directory Federation Services federation, you configure VMware Workspace ONE Access as a relying party (or service provider) for Active Directory Federation Services.
-
On the Active Directory Federation Services server, run the Active Directory Federation Services Management console as an administrator.
-
In the left pane, click Relying Party Trusts to highlight it. Then right-click Relying Party Trusts and select Add Relying Party Trust from the menu.
The Add Relying Party Trust wizard appears.
-
Start the Add Relying Party Trust wizard.
-
Select Claims aware, and then click Start.
-
On the Select Data Source page, select Import data about the relying party published online.
-
In the text box, paste the URL of the VMware Workspace ONE Access Service Provider (SP) metadata content saved earlier and click Next.
The URL resembles
https://{AccessTenant}/SAAS/API/1.0/GET/metadata/sp.xml, where{AccessTenant}is the fully qualified domain name (FQDN) of the VMware Workspace ONE Access service.For example:
https://auth.rainpole.io/SAAS/API/1.0/GET/metadata/sp.xml -
On the Specify Display Name page, in the Display name text box, enter a name for the VMware Workspace ONE Access service.
-
In the Notes, enter a description of this relying party trust and then click Next.
-
Configure the appropriate setting to allow all users access to Workspace ONE after VMware Workspace ONE Access receives the valid claims.
- On the Choose Access Control Policy page, select Permit everyone and click Next.
-
On the Ready to Add Trust page, review your changes and then click Next.
-
On the Finish page, select the option to edit the claim rules or issuance policy after you close the wizard.
-
Select the Configure claims issuance policy for this application check box and then click Close.
Result
The Edit Claim Issuance Policy window appears.
-
-
Add each of the following two rules:
E-mail Address Claim Rule
-
Click Add Rule.
Result
The Add Transform Claim Rule Wizard appears.
-
Under Claim rule template, select the option Send LDAP Attributes as Claims and click Next.
-
Enter a Name for the claim rule such as
Get E-Mail Address Attribute. -
Under Attribute store, select Active Directory.
-
In the mapping table on the first row, under the LDAP Attribute column, select the E-Mail-Addresses option.
-
In the mapping table on the same row, under the Outgoing Claim Type column, select the E-mail Address option and click Finish.
-
Verify that the email address attribute rule appears in the list of claim rules.
-
Next, you add a second rule that transforms the email address attribute in the outgoing claim to the SAML-based format expected by VMware Workspace ONE Access.
Transform Email Address Claim Rule
-
Click Add Rule.
Result
The Add Transform Claim Rule Wizard appears.
-
Under Claim rule template, select the option Send Claims Using a Custom Rule and click Next.
-
Enter a Name for the claim rule such as
Transform E-Mail Address. -
In the Custom rule text box, enter the following script, where
{AccessTenant}at the end of the script is replaced with the fully qualified domain name (FQDN) of the Workspace ONE Access service and click Finish.
c:[Type == "http://schemas.xmlsoap.org/ws/2005/05/identity/claims/emailaddress"] =\> issue(Type = "http://schemas.xmlsoap.org/ws/2005/05/identity/claims/nameidentifier", Issuer = c.Issuer, OriginalIssuer = c.OriginalIssuer, Value = c.Value, ValueType = c.ValueType, Properties["http://schemas.xmlsoap.org/ws/2005/05/identity/claimproperties/format"] = "urn:oasis:names:tc:SAML:1.1:nameid-format:emailAddress", Properties["http://schemas.xmlsoap.org/ws/2005/05/identity/claimproperties/spnamequalifier"] = "{AccessTenant}");
For example:
c:[Type == "http://schemas.xmlsoap.org/ws/2005/05/identity/claims/emailaddress"] =\> issue(Type = "http://schemas.xmlsoap.org/ws/2005/05/identity/claims/nameidentifier", Issuer = c.Issuer, OriginalIssuer = c.OriginalIssuer, Value = c.Value, ValueType = c.ValueType, Properties["http://schemas.xmlsoap.org/ws/2005/05/identity/claimproperties/format"] = "urn:oasis:names:tc:SAML:1.1:nameid-format:emailAddress", Properties["http://schemas.xmlsoap.org/ws/2005/05/identity/claimproperties/spnamequalifier"] = "auth.rainpole.io");
-
Verify that both new rules appear in the rules list, with the custom transformation rule appearing in the second position.
-
Click Apply, and then click OK.
This concludes the integration of Active Directory Federation Services as a federated identity provider for VMware Workspace ONE Access instance. Configuration of NSX-T Data Center and vRealize Suite identity and access continue as usual.
Update VMware Workspace ONE Access Policies for Active Directory Federation Services
-
In a Web browser, log in to the Workspace ONE Access instance by using the administration interface.
Setting Value URL https://auth.sfo.rainpole.io/adminhttps://auth.rainpole.io/adminUsername adminPassword wsa_admin_passwordDomain System Domain -
Select the Identity and Access Management tab. Click Manage, and then click Policies.
-
Select the
default_access_policy_setand click Edit.Result
The Edit Policy window appears.
-
Click Next.
-
On the Configuration page, click the vertical elapse to edit the Web Browser policy rule and create.
a. Specify ADFS - SAML Password as the first authentication method and Password (Local Directory) as the fallback method. Leave the and user belongs to group(s): option blank to apply the rule to all users.
b. Click Save.
!!! success "Result" The new policy rule appears as ADFS - SAML Password in the rules list. -
Click Next.
-
Review your changes and then click Save.
Congratulations, you should now be able to login to all components of the stack using Microsoft Active Directory Federations Services as the Identity Provider!
Rock on.
Disclaimer
This is not an official VMware by Broadcom document. This is a personal blog post.
The information is provided as-is with no warranties and confers no rights.
Please, refer to official documentation for the most up-to-date information.